Fency confirmation popup dialogs in Siebel Open UI
31. 5. 2021

In this blog we deal with implementation of custom confirmation dialog built for Siebel Open UI Framework.
Using Siebel Open UI there are plenty situations when it is need to popup confirm dialog and based on the answer continue or not to continue with the process. Javascript provides standard confirmation dialog which can be triggered using window.confirm("sometext");
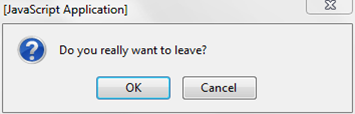
This approach has two main drawbacks. The first is, that OK, Cancel buttons cannot be localized. The second disadvantage is that standard confirm dialog cannot be customized using css and html. If customer uses highly customized Open UI, the plain confirmation dialog does not look very professional.
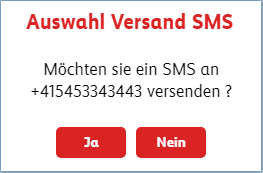
What would you say having confirmation dialog like this, with localized question in german.
We now describe how to create custom confirmation dialog and how to incorporate it into Open UI flow. We define title, confirmation text and buttons and add them into the dialog. For the title we use standard Siebel OpenUI class 'siebui-applet-title', for buttons we use standard button class as well: siebui-ctrl-btn
var $dialogAlert = null;
var $dialogContainer = $('<div />', {
class: 'siebui-applet-title'
});
var $dialogText = $('<div>Do you want do continue? </div><br>', {
class: 'siebui-applet-title'
});
var $dialogButtonDiv = $('<div style="text-align:center;height:60px;"></div>');
var $dialogButtonYes = $('<button type="button" class="siebui-ctrl-btn"
id="send_confirm_yes" style="margin:5px;width:70px">Ja</button>', {
class: 'siebui-ctrl-btn',
});
var $dialogButtonNo = $('<button type="button" class="siebui-ctrl-btn"
id="send_confirm_no" style="margin:5px;width:70px">Nein</button>', {
class: 'siebui-ctrl-btn'
});
After definition of respective components, we compose the confirmation dialog:
$dialogAlert = $('<div id="ccw-modal-loading"></div>');
$dialogContainer.append($dialogText);
$dialogButtonDiv.append($dialogButtonYes);
$dialogButtonDiv.append($dialogButtonNo);
$dialogContainer.append($dialogButtonDiv);
$dialogAlert.append($dialogContainer);
The dialog can be composed of any HTML elemts.
Now the code for showing the dialog:
$dialogAlert.dialog({
title: "",
id: "confirm_modal_dialog",
resizable: false,
draggable: false,
closeOnEscape: false,
modal: true,
width: 376,
height: 200,
open: function () {
$(this).parent().addClass('ccw-loading-modal');
},
close: function () {
$(this).dialog('destroy').remove();
}
});
To handle clicks on “Yes”, “No” buttons
$dialogAlert.on('click', "#send_confirm_yes", function () {
// do some action here.
$dialogAlert.dialog('destroy').remove();
});
$dialogAlert.on('click', "#send_confirm_no", function () {
$dialogAlert.dialog('destroy').remove();
});
The very common use case is to open the confirmation before triggering any Siebel functionality implemented beyond the button, either on client or server side, for instance sending the mail. The execution of Siebel function should happen upon confirmation only. To implement this use case using custom confirmation dialog, we recommend to catch the event of ‘mousedown’ for the button and compose and show the confirmation dialog.
$applet.on('mousedown', '#any_button_class', function (e) {
// compose and show the dialog here.
});
After confirmation with yes, we can continue with the process by artificial triggering of click on orginal button which have triggered opening the confirmation dialog. To satisfy this just add trigger(“click”) into function processing “
$dialogAlert.on('click', "#send_confirm_yes", function () {
$( "#any_button_class" ).trigger( "click" );
$dialogAlert.dialog('destroy').remove();
});
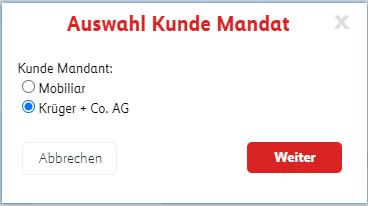
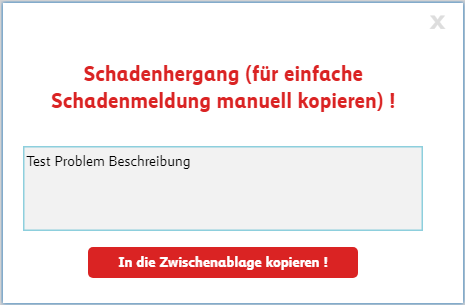
Here are som more examples of customized confimation popup dialogs.
If you have any question regarding the implementation or need some more know-how details, do not hesitate to contact us.
Back to Blog